

A Princess Cake Recipe to celebrate Sweden’s National Day
Today is Sweden's National Day! Let them eat cake...
This post may contain affiliate links. Learn more
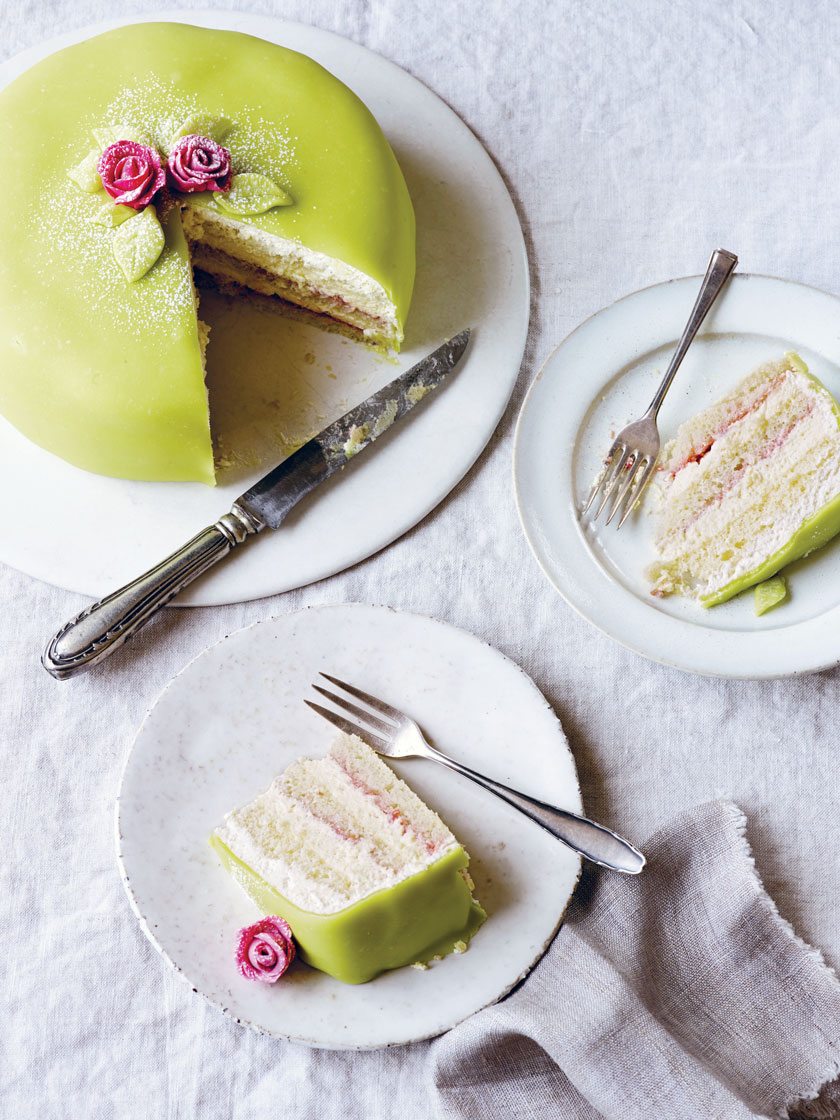
To celebrate Sweden’s National Day, bake up a storm with this Princess Cake recipe from Bronte Aurell’s cookbook ‘ScandiKitchen: Fika & Hygge’.
Swedish Princess Cake Recipe
One of the most famous cakes to come out of Sweden, this traditional celebration cake first appeared in 1948 in The Princesses’ Cookbook , authored by Jenny Åkerström, a teacher of Princesses Margaretha, Märtha and Astrid, daughters of Prince Carl. Originally called Green Cake, the name evolved due to the Princesses’ apparent fondness for it.
Everything you need to know about Hygge
Ingredients
- 1 portion of Layer Cake Bases (see below)
- 1 portion of Pastry Cream (see below)
- 600 ml whipping cream
- 2 tablespoons icing sugar
- 150 g good-quality raspberry jam
- 200 g green marzipan
- pink and green royal icing or marzipan, for the rose and leaves
- icing sugar, for dusting
- a piping bag fitted with a star nozzle
SERVES 8–10
Layer Cake Bases
This base for layer cakes is similar to a very light Genoise sponge. You can, of course, bake these in three pans to make them uniform, but I find it just as easy to draw circles on baking parchment and then cut the edges to fit once baked. Some people use baking powder in layer cakes but I usually opt to use just eggs and sugar as the leavener because I feel the end result is more delicate. However, it can be trickier. The secret is to whip the eggs and sugar properly to ribbon stage – this can take several minutes to achieve. Secondly, when you fold in the flour, do so very gently in figure-of-eight folds and don’t rush it.
Ingredients:
- 25 g butter, melted and set aside to cool
- 4 eggs
- 120 g caster sugar
- 120 g plain flour or cake flour
- a pinch of salt
- 1 teaspoon vanilla sugar OR extract OR use the seeds of 1 vanilla pod
- 3 baking sheets, greased and lined with baking parchment
Method:
- Preheat the oven to 180°C (350°F) Gas 4.
- Beat together the eggs and sugar on high speed in a stand mixer or using a hand-held electric whisk. Beat until the mixture reaches ribbon stage – you will be able to see the traces of the mixture when you move the whisk.
- Use a 20-cm diameter plate to draw three circles on baking parchment. Cut these out and place one parchment circle on each of the three baking sheets. Set aside.
- Combine the flour, salt and vanilla in a separate bowl. Sift into the egg mixture, bit by bit, carefully folding using a figure-of-eight movement until incorporated. Pour the cooled melted butter down the side of the bowl and fold carefully again, trying not to knock out air.
- Divide the mixture evenly between the parchment circles on the baking sheets spreading right to the edges of each circle with the back of a spoon. If they go over a bit, don’t worry, you can cut these bits off afterwards.
- Bake in the preheated oven for about 5–7 minutes or until light golden brown.
- Remove from the oven and allow to cool completely before removing the baking parchment. If the parchment sticks, slightly dampen the paper side with cold water and the paper will come off easily. Trim any untidy edges using a sharp knife.
- Note: If you really want to use baking powder, add 1 teaspoon to the flour for a slight lift.
Pastry Cream
There is something so deliciously decadent about cakes with pastry cream. The comfort of custard, I usually call it. I love making it from scratch and use it for anything from filling cakes to layering trifles and serving it with crumbles (for that, I simply thin with a bit of milk). The only thing to watch out for is not to burn the milk, as this will spoil the whole lot.
Ingredients:
- 500 ml whole milk
- 1 vanilla pod, seeds scraped
- 1 whole egg plus 1 egg yolk
- 100 g caster sugar
- 30 g cornflour
- 1/2 teaspoon salt
- 25 g butter
MAKES APROX. 600–625 G
Method:
- In a saucepan, heat the milk with the scraped out seeds from the vanilla pod.
- In a separate bowl, whisk together the eggs and sugar and add the cornflour.
- When the milk has just reached boiling point, take off the heat and pour one third into the egg mixture while whisking continuously.
- Once whisked through, pour the egg mixture back into the remaining hot milk. Return to the stove and bring to the boil, carefully. Whisk continuously as the mixture thickens, for just under a minute, then remove from the heat and stir in the salt and butter.
- Pour into a cold bowl and place a sheet of baking parchment on top to prevent the cream from forming a crust as it cools. The mixture will keep well in the refrigerator for a few days.
Princess Cake
Method:
- Whip the cream with the icing sugar until stiff. Spoon two thirds into a separate bowl. Mix the remaining one third of the whipped cream with the prepared pastry cream.
- Make sure your prepared layer cake bases are completely even in size. If not, trim to fit. Place the bottom layer on your chosen serving plate; you won’t be able to move the cake once assembled.
- Spread the raspberry jam/jelly evenly onto the base layer of the cake, then add half of the pastry cream mixture. Top with the second cake layer. Repeat with the remaining jam/jelly and second helping of the pastry cream mixture. Add the top cake layer.
- Using a cake spatula, spread three quarters of the remaining stiffly whipped cream in a thick layer on the top and the sides of the cake. Make sure the cake is covered evenly all over to prevent jam from seeping out. Some people prefer to shape the cream into a dome; I quite like more of a level top on my princess cake, but it is up to you.
- Next, roll out the green marzipan on a surface lightly dusted with icing sugar or over the top of baking parchment (to prevent sticking). Roll out into a large, even circle, big enough to cover the top and sides of the cake (around 35 cm diameter).
- Carefully drape the marzipan on top of the cake and peel back the baking parchment, if using. Pull gently around the edges to bring the marzipan down to cover the cake, taking care not to overstretch. Once the marzipan is smoothed over and touching the base all the way around, trim away the excess. Press the edges gently in at the base.
- To make the rose decorations, mould the pink royal icing or marzipan into 2 cm tall teardrop shapes for the inside buds. Then roll out small round petal-shaped pieces of icing around 2 x 2 cm and wrap each one around the bud in layers. Cut the base off and fix the roses on top of the cake. Lastly, roll out the green royal icing or marzipan and cut out leaf shapes to fix by the sides of the rose. Dust with icing sugar before serving.
Read more: Is Lagom the new Hygge
More Cake: Parsnip and Orange Spiced Cake Recipe