Bread Ahead’s Famous Doughnut Recipe
By
2 years ago
Try your hand at these notoriously delicious baked treats
Looking to get crafty in the kitchen? The Bread Ahead doughnut is famous for a reason – and with this handy recipe, you can create your own. Give them a go this week to become the most popular person in your group of friends.
How To Make Bread Ahead’s Famous Doughnuts
What’s The Hype Around Bread Ahead’s Doughnuts?
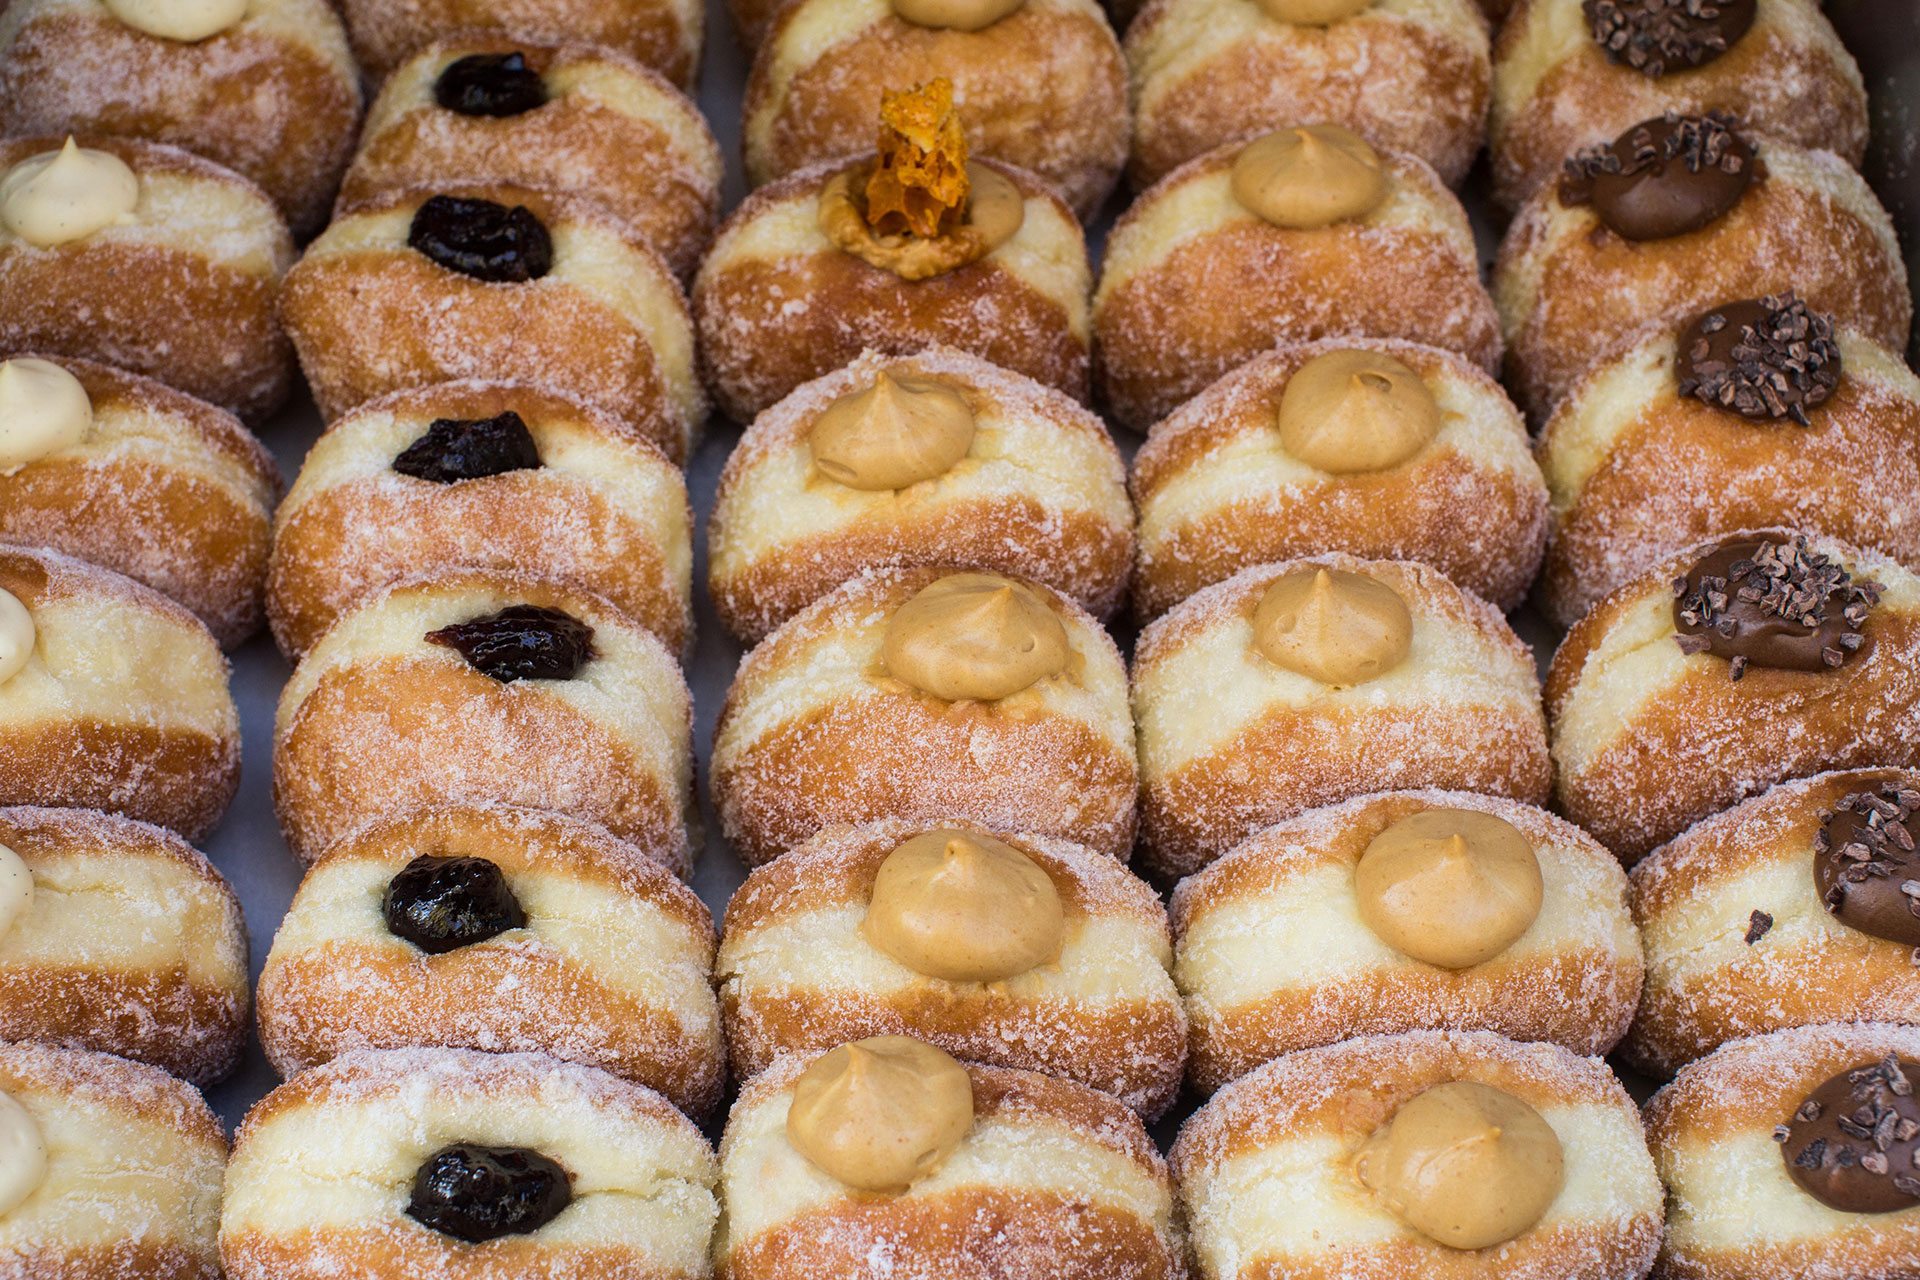
One of London’s most beloved bakeries, Bread Ahead has outposts across the city, which sell all manner of delicious treats: sourdough, croissants, cakes, you name it. But the product that has risen to cult status is its doughnuts. These pillowy, sugary treats are flavoured with an array of delicious fillings, including jam, cream and chocolate. They tend to sell out super quickly, particularly on weekends, so if you don’t fancy rushing to Borough Market to queue up with the other hungry punters, why not have a go at making your own? We’ve nabbed the recipe below.
Recipe: Bread Ahead Doughnuts
Makes about 20 doughnuts (about 1kg dough)
Preparation time: 45 minutes, plus proving and overnight chilling
Cooking time: 4 minutes per doughnut, fried in batches; about 30-40 minutes total
Ingredients
- 500g strong white bread flour
- 60g caster sugar
- 10g fine sea salt
- 15g fresh yeast (or 8g instant/quick/fast-acting dried yeast)
- 4 eggs (1 egg = 50 grams)
- Zest of ½ lemon
- 150g cold water
- 125g softened unsalted butter
- About 2 litres sunflower oil, for deep-frying
- Caster sugar (for tossing)
Method
- Bring all of the dough ingredients apart from the butter together in a bowl, tip onto the table, and using the heel of your hand, stretch and tear for 8 minutes.
- (If using an electric mixer, put all of the dough ingredients apart from the butter into the bowl of your mixer and, with the beater attachment, mix on a medium speed for 8 minutes or until the dough starts coming away from the sides and forms a ball.)
- Let the dough rest for 1 minute. (If using an electric mixer, take care that it doesn’t overheat – it needs to rest as well as the dough!).
- Continue to stretch and tear the dough, adding the butter 25g at a time, until it is all incorporated. Stretch and tear the dough for a further 5 minutes until it is glossy, smooth and very elastic when pulled. (If using a mixer, start it up again on a medium speed and slowly add the butter to the dough – about 25g at a time. Once it is all incorporated, mix on high speed for 5 minutes).
- Return your dough to the bowl, cover with cling film and leave to prove until it has doubled in size. Knock back the dough, the re-cover the bowl and put into the fridge to chill overnight.
- The next day, take the dough out of the fridge and cut into 50g pieces (you should get about 20). Roll them into smooth, taught, tight buns and place them on a floured baking tray, leaving plenty of room between them as you don’t want them to stick together while they prove. Cover lightly with cling film and leave for about 4 hours, or until about doubled in size.
- Get your deep-fat fryer ready, or get a heavy-based saucepan and fill it up to the halfway point with sunflower oil (please be extremely careful, as hot oil is very dangerous). Heat the oil to 180°C.
- When the oil is heated to the correct temperature, carefully remove the doughnuts from the tray by sliding a floured pastry scraper underneath them, taking care not to deflate them, and put them into the oil. Do not overcrowd the fryer – do 2-3 per batch, depending on the size of your pan. Fry for 2 minutes on each side until golden brown – they puff up and float, so you may need to gently push them down after about a minute to help them colour evenly. Remove from the fryer and place on kitchen paper, then toss them in a bowl of caster sugar while still warm.
- Repeat until all are fried, BUT make sure the oil temperature is correct every time before you fry – if it is too high they will colour too quickly and burn, and will be raw in the middle, and if it is too low the oil will be absorbed into the doughnut and it will become greasy. Set aside to cool before filling.
- To fill the doughnuts, make a hole in the crease of each one (anywhere around the white line between the top and bottom). Fill a piping bag with your desired filling and pipe into the doughnut until swollen with pride. Roughly 20-50g is the optimum quantity, depending on the filling; cream will be less, because it is more aerated. You can fit in more than this, but it doesn’t give such a good balance of dough to filling.
Popular fillings at Bread Ahead are jam, flavoured custards and chocolate. Get creative and make these doughnuts your own. The doughnuts are best eaten straight away, but will keep in an airtight tin and can be reheated to refresh them.