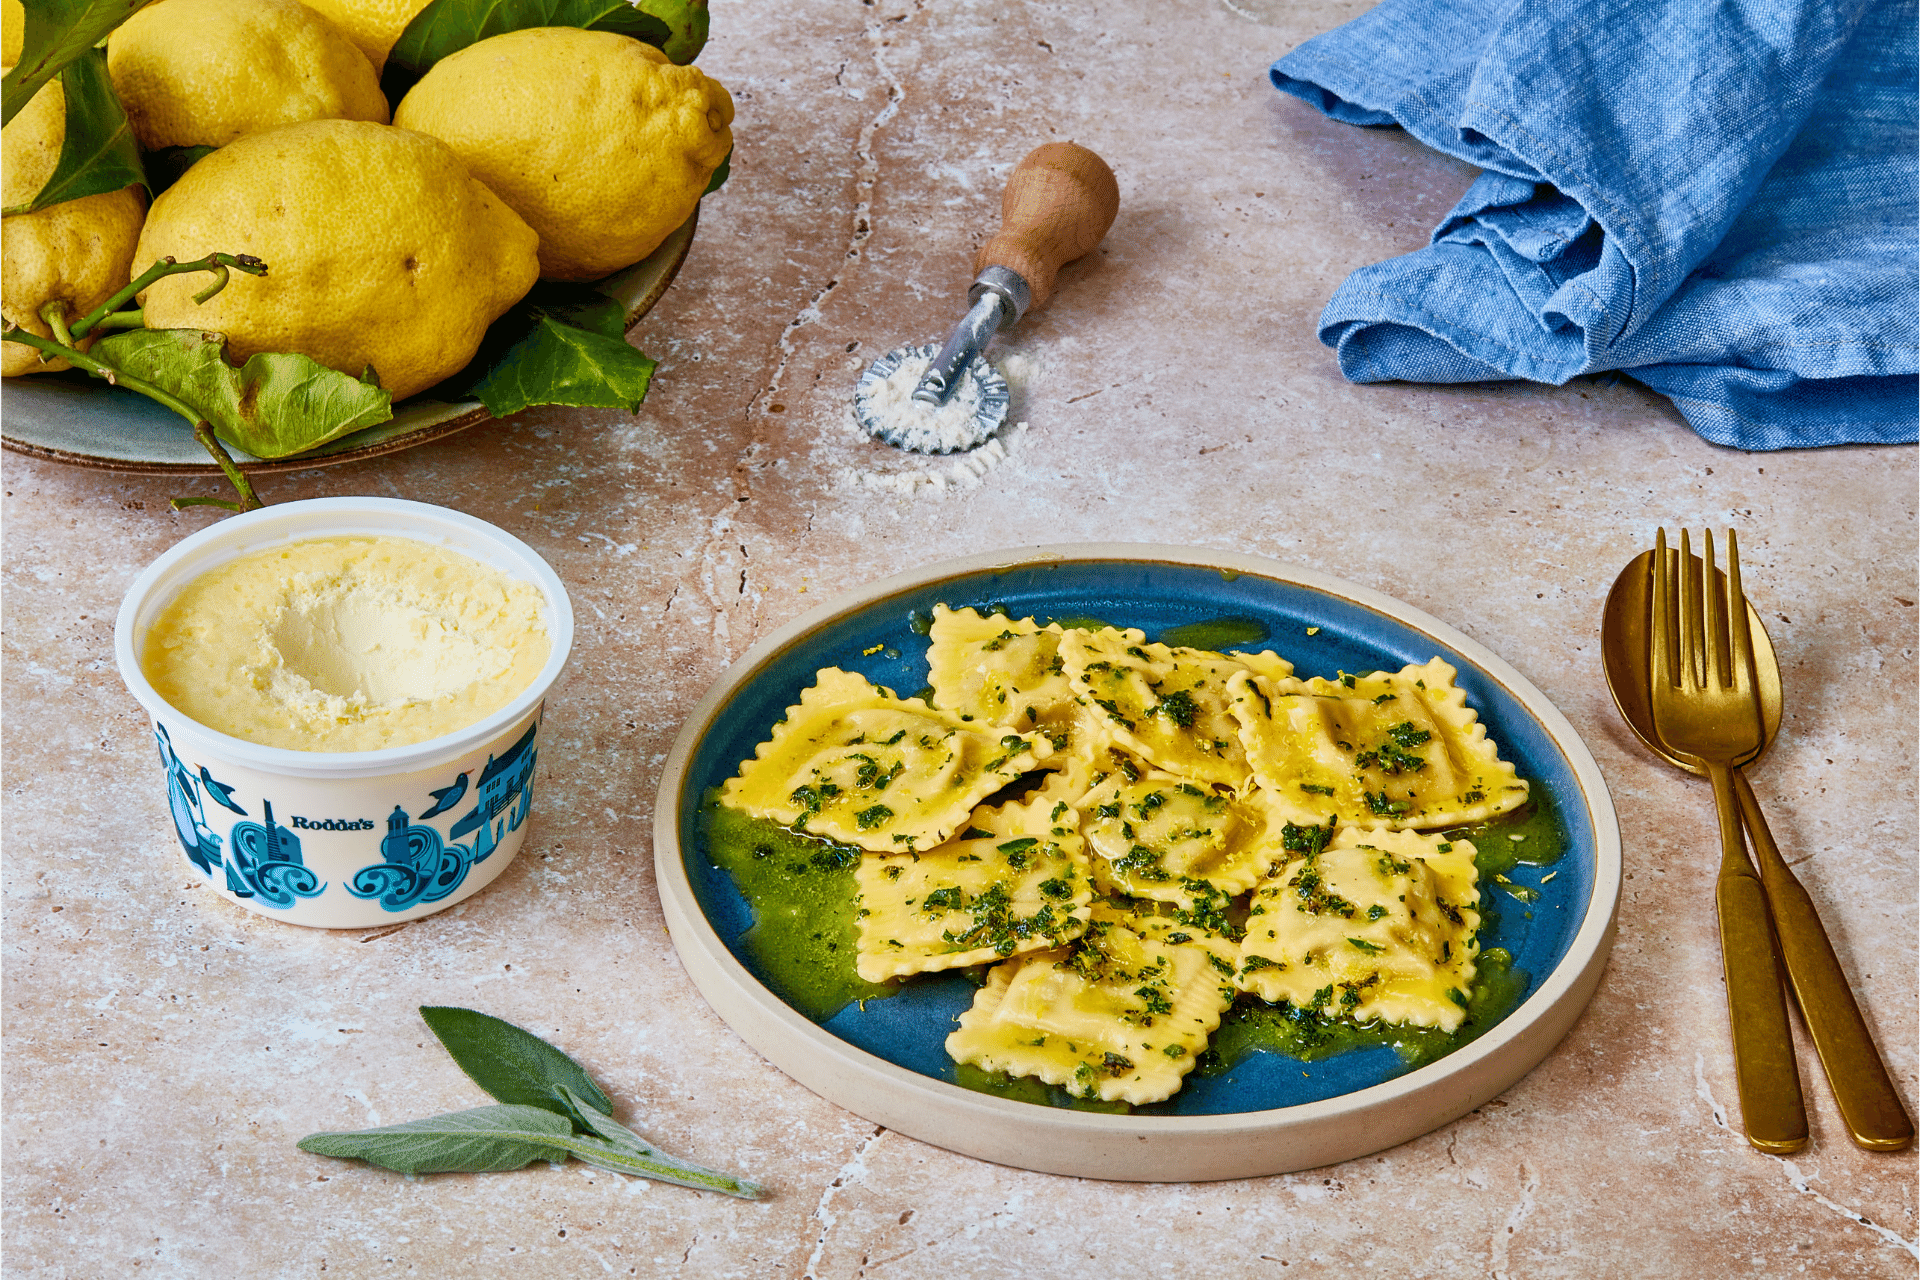
Recipe: Pumpkin, Parmesan & Rodda’s Cornish Clotted Cream Ravioli
By
4 years ago
Clotted cream is not just for cream teas
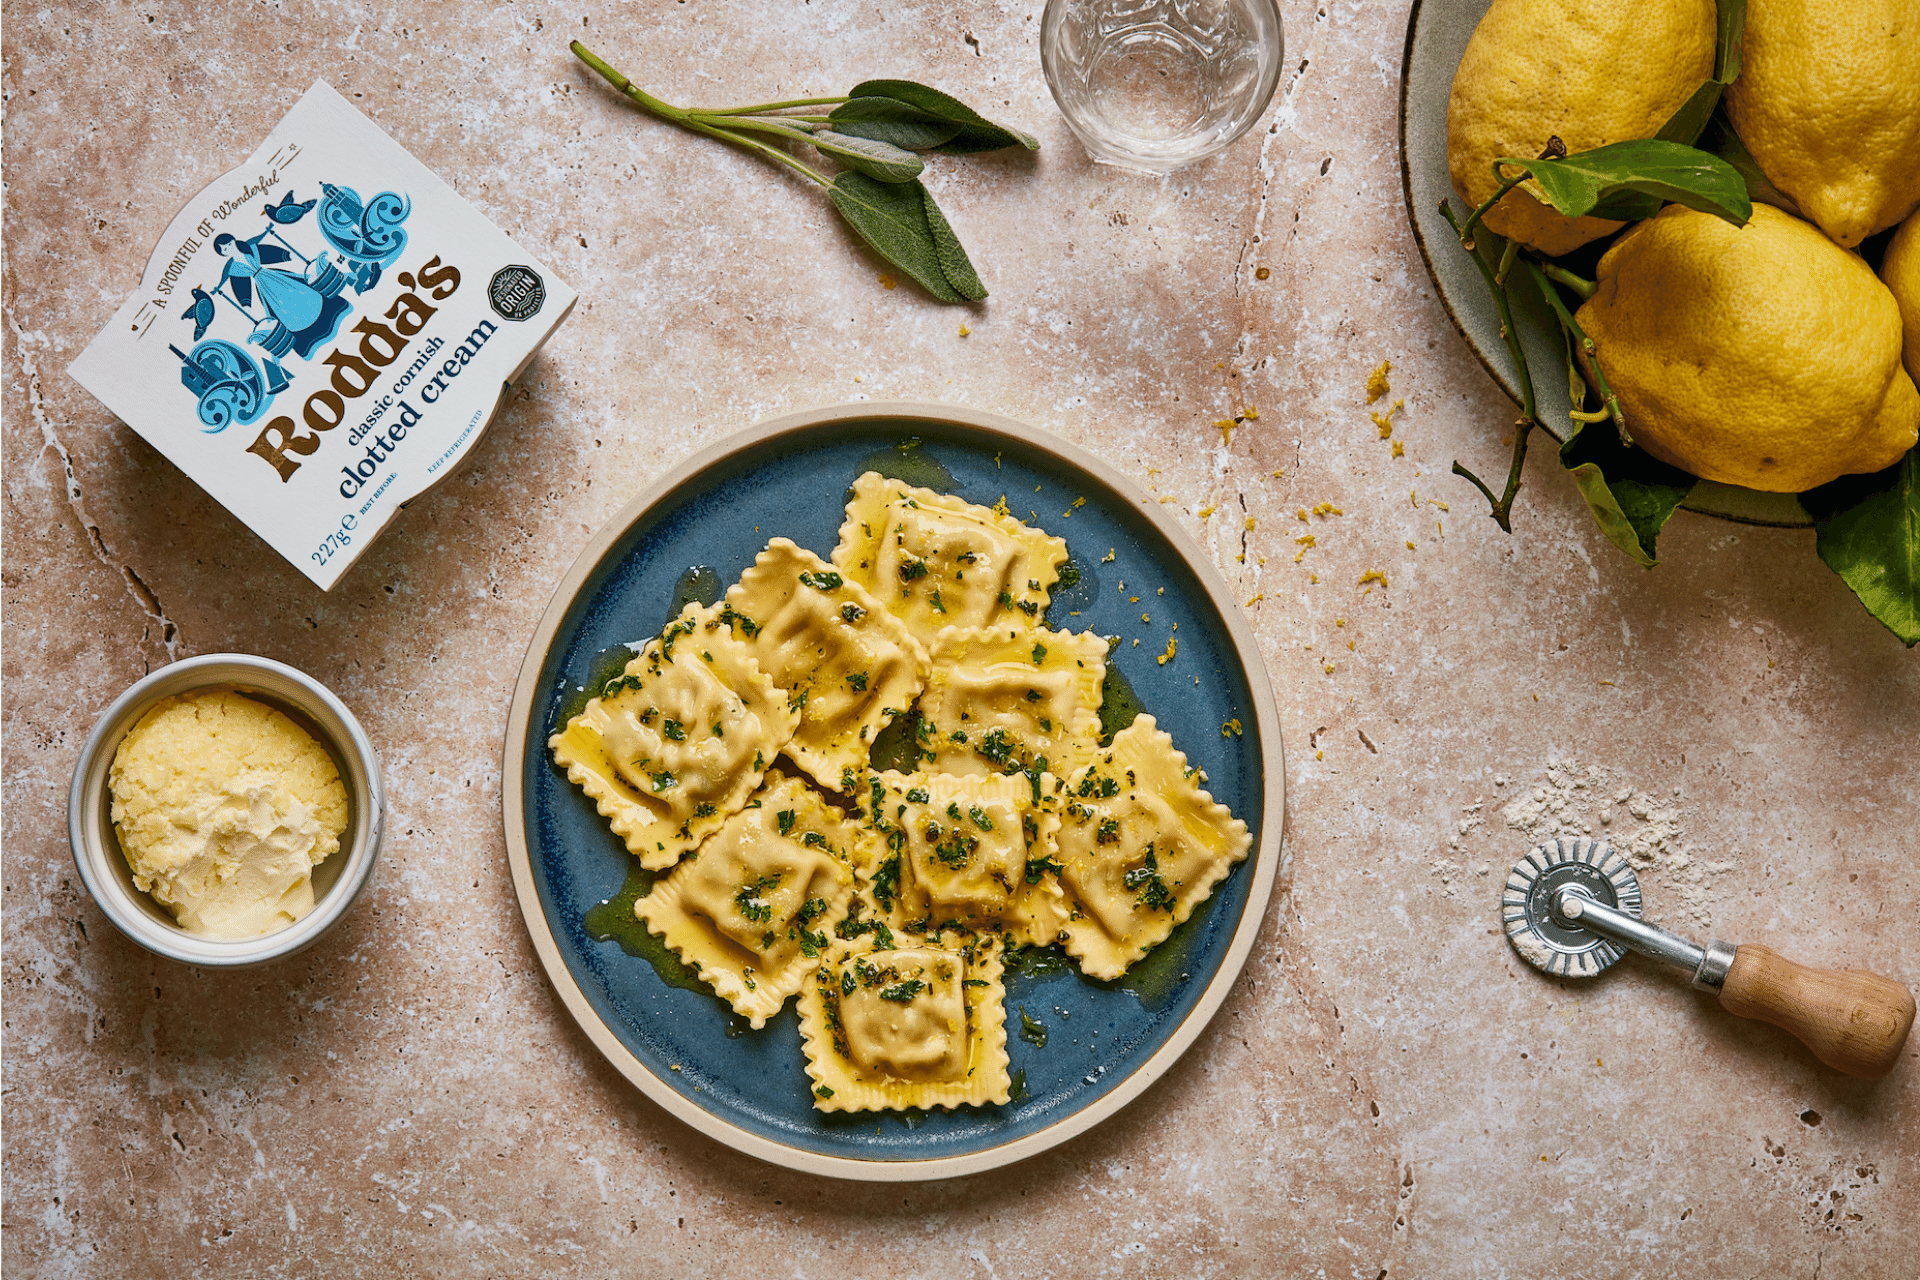
Created by Roberta d’Elia, Head Chef at Pasta Evangelists, this mouth-watering ravioli recipe is made special with Rodda’s Cornish clotted cream.
Recipe: Pumpkin, Parmesan & Rodda’s Cornish Clotted Cream Ravioli
Serves 3
Ingredients
For the ravioli
- 300g 00 pasta flour
- 3 eggs
For the pasta filling
- 300g of pumpkin, cubed
- 40g Parmesan (grated)
- 40g breadcrumbs
- 35g Rodda’s Cornish clotted cream
- Salt and pepper, to taste
For the butter sauce and garnish
- 4 tablespoons of butter
- A handful of fresh herbs (we suggest fresh sage, parsley or thyme)
Tools
- Pasta machine or rolling pin
- Pasta cutter, or a kitchen knife
- Ravioli stamp, or a standard wine glass
Method
1. Make the fresh pasta dough. On a clean work surface, pile the flour into a mound. Make a well in the centre of the mound, large enough for the eggs. Crack the eggs into the well. Beat the egg mixture with the fork, slowly pulling the flour from the sides of the well until all the egg has been absorbed by the flour. As the mixture thickens, start using your hands and a scraper to continue incorporating the flour. If needed, drizzle a small amount of warm water and continue mixing until you have a ball of dough. Clean the work surface of any excess flour or dough. Then lightly flour your clean work surface. Knead the dough by pressing the heel of one hand into the dough ball, keeping your fingers high. Press down on the dough while pushing it firmly away from you. The dough should stretch and roll under your hand to create a shell-like shape. Turn the dough over, then press into the dough with your knuckles, one hand at a time. This process should be carried out around 10 times. Bring the dough back into a ball and repeat the stretching and knuckling process, using more flour if needed to prevent any stickiness. Repeat the process for about 10-20 minutes until the dough is smooth and silky. Roll the dough into a smooth ball and cover it with a wrap. Let the dough rest for at least 30 minutes at room temperature or for up to 1 day in the refrigerator.
2. Prepare the filling. Add the pumpkin and Rodda’s Cornish clotted cream in a bowl and season. Squeeze in the lemon juice and the grated zest. Mix everything by hand with a fork or spoon until roughly combined. Cover the mixture and refrigerate for an hour, allowing the mixture to firm up (thereby easing the filling process). If making the vegetarian alternative with pumpkin, start by preheating your oven. Scatter your cubed pumpkin on a baking tray and season with salt and pepper. Cover with baking paper. Bake at 200°C for 25-30 minutes until tender and slightly browned. Remove and let it cool. To create the filling, add the pumpkin, the Parmesan and Rodda’s clotted cream to a bowl. Mix everything by hand with a fork or spoon until roughly combined. If the filling is too runny, you can add extra Parmesan or breadcrumbs.
3. Roll out your pasta. Once the pasta has rested, lightly flour your surface and, using your fingers, slightly flatten your pasta dough, shaping it into a rough circle. Set up your pasta machine, clamping it to a table, countertop or sturdy cutting board. Set the dial to its widest setting. Feed the flattened sheet of pasta through the machine at least 3 times before moving on to the next setting. From this point, you can continue to feed your dough through the machine (once per setting), making your way from the thickest setting to the thinnest. If need be, dust the sheet of dough with flour to prevent it from sticking to the machine. If you don’t have a pasta machine, you can do this with a rolling pin. Begin rolling the dough as you would with a pastry crust, starting in the centre and rolling away from you to the outer edge. Turn the dough a few inches clockwise, and repeat. Keep working your way around, scattering a small amount of flour on the dough whenever it starts to stick to the surface or the rolling pin. You’ll know you’ve created the perfect ‘sfoglia’ for ravioli when you can clearly see your hands through the sheet.
4. Fill and seal the ravioli. Once you have your long pasta sheet, use a knife or a pasta cutter to cut it evenly in half, lengthways, and wet the edges of your strip of pasta with a pastry brush or by hand. Using a teaspoon or piping bag, dot the filling in a line down the centre of one of the strips about 2 inches, or 5cm, apart. Place the other strip directly on top of the filling. Before sealing, gently press on the dough around the filling to eliminate any excess air. Next, very lightly moisten the dough with your hands and press it firmly closed. Now take a square ravioli cutter (a wine glass works well for circular ravioli) and press firmly on the dough around the filling. Finish with a final dusting of flour to keep your ravioli from sticking together and allow to rest on a wooden board for about 30 minutes to help dry out and seal the dough further before boiling.
5. Cook your pasta. Bring a large pot of water to boil, adding a generous sprinkling of salt once it has come to a boil. Place the ravioli in the water and cook for 2-3 minutes.
6. Prepare the butter sauce and garnish. Meanwhile, melt the butter on low heat in the frying pan along with the fresh herbs and a pinch of salt until the butter is golden brown. Once the pasta is cooked, transfer the ravioli from the water with a slotted spoon straight into the frying pan with the herb butter, adding 1-2 tablespoons of pasta water and toss gently to coat the ravioli with the buttery sauce. Be careful as the pasta will be delicate once cooked. Serve immediately and enjoy!
Featured image: Rodda’s